D E V L O G #2 - Canvas & Movement
So first things first with making this game, I know I'm going to be using the HTML Canvas.
I've had to use the canvas before in a bunch of stuff in my full-time job for all sorts of different graphical representations so I have a good idea around some of the things that can be done and how it can apply in the game dev world.
For my game I want to be able to generate different rooms, and have the player be able to move around the room and interact with enemies and obstacles. What I'll need is a list of different 'objects' that make up a room, and render these objects through the canvas on a loop.
For our objects, eventually we'll have all sorts of properties. For now we'll just give them an x co-ordinate, y-co-ordinate, a width, and a height. As well we will need to have the canvas element itself and the canvas 'context' handy. The context is where we can actually draw our sprites and stuff.
With these variables we can draw stuff to the canvas in our render loop function.
var objects = [
  {x: 0, y: 0, width: 16, height: 16},
  {x: 16, y: 96, width: 16, height: 16},
  {x: 32, y: 48, width: 16, height: 16},
  {x: 0, y: 64, width: 16, height: 16},
];
var canvas = document.getElementById('canvas');
var context = canvas.getContext('2d');
I used 16 for the width and height as later down the line I know I'll be using a 16x16 grid system, so I just wanted to put this in for now!
With these references, we can build our render function. We need to clear the canvas of anything it had drawn on it before, otherwise we'll get loads of sprites building up all the time, and then draw our objects in position.
function renderLoop() {
  // clear the canvas context
  _context.clearRect(0, 0, _canvas.clientWidth, _canvas.clientHeight);
  // render each object
  objects.forEach(function(o) {
    _context.drawRect(o.x, o.y, o.width, o.height);
  });
}
To run our render loop, we can just use an interval:
setInterval(renderLoop, 10);
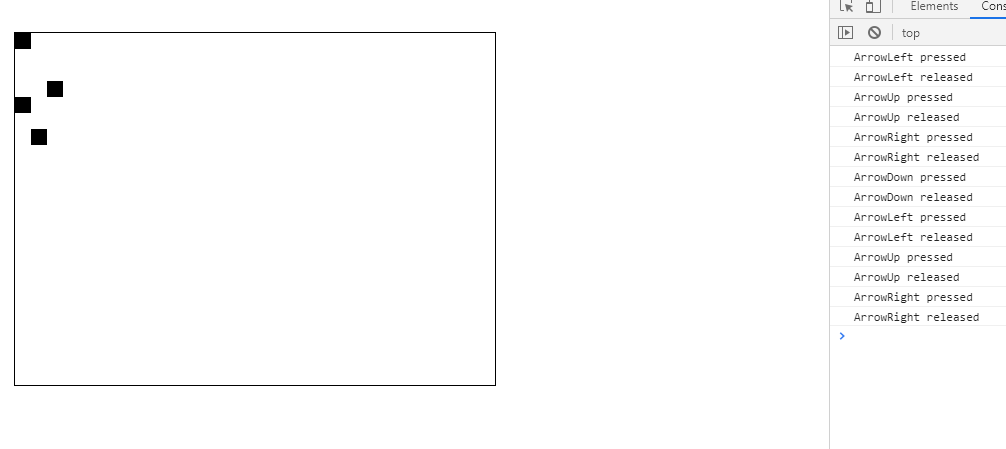
All together when run, we end up with something like this:
Not that exciting, but you get the idea. Now we want something to represent the player, and we want to be able to move them. For this we can just add a new object, separate to our room objects, so that we can access them easier (as we will need to be messing around with it a lot).
var player = {
  x: 96,
  y: 96,
  width: 16,
  height: 16,
}
For movement, for now we'll just use the arrow keys. Later down the line we'll want to add some key mapping, so instead of the arrow keys it's just an abstract concept of 'up' 'down' etc, but for now arrow keys are plenty.
What we'll do is listen for key events, and store them in an object we can always reference. I want to know whether a key is pressed up or down so what I'll do is just mark the key as either 'true' or 'false'
var keys = {};
function keyEvent(ev, up) {
  console.log(ev.key + (up == true ? ' pressed' : ' released'));
  keys[ev.key] = up;
}
document.addEventListener('keydown', function(ev) { keyEvent(ev, true); });
document.addEventListener('keyup', function(ev) { keyEvent(ev, false); });
Now what this will do is whenever you press a key down the 'keys' object will store the value of the key, along with 'true' or 'false' based on whether the key is down or not. That means we can check what keys are currently pressed! As we press keys, our console will look like this:

Now we know what keys are being pressed, we can update the player's x and y co-ordinates in our render loop if the specific keys are pressed. We'll update our render loop to include these changes, and render the player like we do the objects.
function renderLoop() {
  // clear the canvas context
  context.clearRect(0, 0, canvas.clientWidth, canvas.clientHeight);
  // render each object
  context.fillStyle = '#0D2B45'; // set colour
  objects.forEach(function(o) {
    context.fillRect(o.x, o.y, o.width, o.height);
  });
  // change player position
  if (keys.ArrowLeft === true) player.x -= 1;
  if (keys.ArrowRight === true) player.x += 1;
  if (keys.ArrowUp === true) player.y -= 1;
  if (keys.ArrowDown === true) player.y += 1;
  context.fillStyle = '#D8BFD8';  // set colour
  // render player
  context.fillRect(player.x, player.y, player.width, player.height);
}
You'll notice we also added in some colours. When using the canvas you need to set the colour of the object before you draw it, so I need to set it for the objects for a darker colour and then again before the player for a separate colour. (Shoutouts to Xavier for the incredible Nyx8 colour palette btw)
When we run this and use the arrow keys, we'll now have our player moving around!

That's all for this log! Next time I'm going to look at building a basic collision engine so we can start to build some properties into our objects, like whether or not they are 'solid' and stop the player from moving through them.
T H I S T L E
A R T E M I S
| Status | In development |
| Author | T H I S T L E |
| Genre | Adventure, Puzzle |
| Tags | 2D, Dungeon Crawler |
More posts
- D E V L O G #5 - Tile Variation & Player DirectionAug 26, 2019
- D E V L O G #4 - Pixels & TilesetsAug 23, 2019
- D E V L O G #3 - JS Modules & Basic CollisionAug 19, 2019
- D E V L O G #1 - Getting startedAug 15, 2019
Leave a comment
Log in with itch.io to leave a comment.