D E V L O G #4 - Pixels & Tilesets
So carrying on since last week, I started working on some basic pixel art to get me started. Normally I wouldn't let myself start designing things when the underlying code isn't done, but this is outside of office hours now and I'm not the boss of me, so instead I had a bit of fun coming up with a little dungeon mockup on a 16x16 grid. I used GraphicsGale for drawing the pixel art.

Look at him, he's adorable, and eager to get exploring! And also trapped indefinitely in this room forever.
I used the #NYX8 palette by Javier Guerrero, which is one of my favourite colour palettes, so it was a no-brainer to use it for this! Go check them out on Twitter!
As we're using a 16x16 grid, we'll want to be saving a tileset image with all the different tiles on it, which will look something like this:

Each tile is going to have a specific x and y co-ordinate on the tileset, and map up to an 'entity' in our game. For now we only have the floor and the walls, but we still need to map them. For each tile we want to give it a specific 'ID', as later down the line when we build rooms we want to be able to just reference the floor as '0' and a wall as '1' or whatever. We also want to be able to represent a room as a collection of tiles. For that end I've made a 15x11 sized room using arrays:
// tileset map
var _tiles = {
  '0': { name: 'floor', x: 0, y: 0, width: 16, height: 16, solid: false },
  '1': { name: 'wall', x: 32, y: 0, width: 16, height: 16,  solid: true }
};
// example room
var _room = [
  ['1', '1', '1', '1', '1', '1', '1', '1', '1', '1', '1', '1', '1', '1', '1'],
  ['1', '0', '0', '0', '0', '0', '0', '0', '0', '0', '0', '0', '0', '0', '1'],
  ['1', '0', '0', '0', '0', '0', '0', '0', '0', '0', '0', '0', '0', '0', '1'],
  ['1', '0', '0', '0', '0', '0', '0', '0', '0', '0', '0', '0', '0', '0', '1'],
  ['1', '0', '0', '0', '0', '0', '0', '0', '0', '0', '0', '0', '0', '0', '1'],
  ['1', '0', '0', '0', '0', '0', '0', '0', '0', '0', '0', '0', '0', '0', '1'],
  ['1', '0', '0', '0', '0', '0', '0', '0', '0', '0', '0', '0', '0', '0', '1'],
  ['1', '0', '0', '0', '0', '0', '0', '0', '0', '0', '0', '0', '0', '0', '1'],
  ['1', '0', '0', '0', '0', '0', '0', '0', '0', '0', '0', '0', '0', '0', '1'],
  ['1', '0', '0', '0', '0', '0', '0', '0', '0', '0', '0', '0', '0', '0', '1'],
  ['1', '1', '1', '1', '1', '1', '1', '1', '1', '1', '1', '1', '1', '1', '1']
];
What we can then do when the game loads, before we render the canvas, is convert the room into a list of entities! We can get the x and y position of the tile based on it's position in the room array, and we know the sizes of the tiles will always be 16x16.
_room.forEach(function(row, ri) {
  row.forEach(function(tile, ti) {
    if (tile == 1) _objects.push(new $Factory.Entity(ti * 16, ri * 16, 16, 16));
  })
});
Now when the game starts we can loop through each 'row' in the room, and each 'tile' in that row, and create an entity based on the type of tile. In this case, we're using '1' for a wall, and adding it to the room. When we run the game we now get a layout matching our room!

One thing wrong is we're actually rendering the room at actual size, meaning it looks tiny! For our game we want to scale that up, so we're going to double the scaling of the canvas. We can do this before we start the game loop:
_context.scale(2, 2);
This gives us a much better rendering!

To add in our actual tiles that we've designed, we can update that initial processing of the room tiles to pass in the 'tile' for that entity. We can then reference the type of tile in the render loop. So now in our render loop instead of using the canvas fillRect method, we use drawImage:
_entities.forEach(function(e) {
  _context.drawImage(_tileset, e.tile.x, e.tile.y, e.tile.width, e.tile.height, e.x, e.y, e.width, e.height);
});
As each entity now has a reference to the relevant tile in the tileset map, we can get the tile's x and y co-ordinates related to the tileset, and use that to draw the entity, and it looks like this:

Don't worry, that's not your monitor, or the image, it really does look that blurry! After some serious digging I found I need to add the following context tweaks to the canvas context before the render loop began:
_context.webkitImageSmoothingEnabled = false;
_context.mozImageSmoothingEnabled = false;
_context.imageSmoothingEnabled = false;
It seems that by default the canvas has smoothing turned on, so we need to turn it off. Now when we run the game it looks much better!

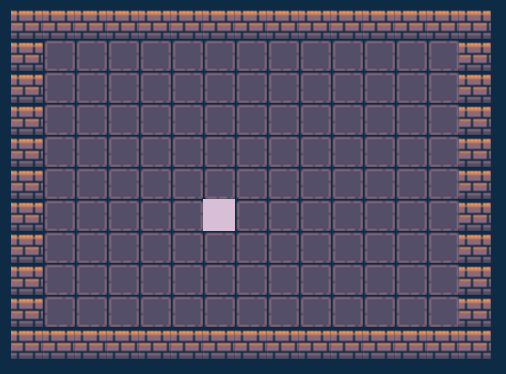
Obviously the walls need to be using the right sprite, but that's just a case of adding the 8 different walls into our tileset map as different IDs, and then we can reference them in our room. Updating the tileset map and the room to look like:
// tileset map
var _tiles = {
  'FF': { name: 'floor', x: 0, y: 0, width: 16, height: 16, solid: false },
  'WT': { name: 'wall-top', x: 32, y: 0, width: 16, height: 16,  solid: true },
  'WL': { name: 'wall-right', x: 80, y: 0, width: 16, height: 16,  solid: true },
  'WB': { name: 'wall-right', x: 64, y: 0, width: 16, height: 16,  solid: true },
  'WR': { name: 'wall-right', x: 48, y: 0, width: 16, height: 16,  solid: true },
  'C1': { name: 'corner-top-left', x: 96, y: 0, width: 16, height: 16,  solid: true },
  'C2': { name: 'corner-top-right', x: 112, y: 0, width: 16, height: 16,  solid: true },
  'C3': { name: 'corner-bottom-left', x: 96, y: 16, width: 16, height: 16,  solid: true },
  'C4': { name: 'corner-bottom-right', x: 112, y: 16, width: 16, height: 16,  solid: true },
};
// example room
var _room = [
  ['C1','WT','WT','WT','WT','WT','WT','WT','WT','WT','WT','WT','WT','WT','C2'],
  ['WL','FF','FF','FF','FF','FF','FF','FF','FF','FF','FF','FF','FF','FF','WR'],
  ['WL','FF','FF','FF','FF','FF','FF','FF','FF','FF','FF','FF','FF','FF','WR'],
  ['WL','FF','FF','FF','FF','FF','FF','FF','FF','FF','FF','FF','FF','FF','WR'],
  ['WL','FF','FF','FF','FF','FF','FF','FF','FF','FF','FF','FF','FF','FF','WR'],
  ['WL','FF','FF','FF','FF','FF','FF','FF','FF','FF','FF','FF','FF','FF','WR'],
  ['WL','FF','FF','FF','FF','FF','FF','FF','FF','FF','FF','FF','FF','FF','WR'],
  ['WL','FF','FF','FF','FF','FF','FF','FF','FF','FF','FF','FF','FF','FF','WR'],
  ['WL','FF','FF','FF','FF','FF','FF','FF','FF','FF','FF','FF','FF','FF','WR'],
  ['WL','FF','FF','FF','FF','FF','FF','FF','FF','FF','FF','FF','FF','FF','WR'],
  ['C3','WB','WB','WB','WB','WB','WB','WB','WB','WB','WB','WB','WB','WB','C4']
];
Gives us a room that looks like this:

Later on rather than write these rooms by IDs, we'll make a little room builder so we can quickly make rooms and save the result to a file, but for now we'll keep it this way!
That's all for this weeks log! Next week I'll look at 'randomising' the tiles a bit so it doesn't end up looking so samey, and make it so our player sprite is rendered and in the right direction as we move them around.
T H I S T L E
A R T E M I S
| Status | In development |
| Author | T H I S T L E |
| Genre | Adventure, Puzzle |
| Tags | 2D, Dungeon Crawler |
More posts
- D E V L O G #5 - Tile Variation & Player DirectionAug 26, 2019
- D E V L O G #3 - JS Modules & Basic CollisionAug 19, 2019
- D E V L O G #2 - Canvas & MovementAug 16, 2019
- D E V L O G #1 - Getting startedAug 15, 2019
Leave a comment
Log in with itch.io to leave a comment.